Showing posts with label baking. Show all posts

07 December 2015

Mocha Chip Brownies

This brownie recipe is decadent. Cut them into smaller pieces than you normally would, because there is a lot of chocolate goodness in just a small square!

These don't need frosting. Great all on their own; they disappear FAST around here. If I ever needed to bribe anyone, this would be my go-to recipe :)

I'm going to try making them this week with some crushed candy cane sprinkled on top once they come out of the oven for a fun Christmas twist.

I've figured out the measurements so you can use a scale if you want to be really accurate. I love baking using scales! Especially to measure flour. I detest spooning flour into a measuring cup and then levelling it off. I always make a mess. Dumping it straight into a bowl and getting the right number to show up is sooo much easier! 

  • 226g butter (1 cup)
  • 283g chocolate chips (1 1/4 cups) + another 129g (2/3 cup) (keep separated)
  • 1/2 cup unsweetened cocoa
  • 1 tbsp + 1 1/2 tsp instant coffee (one with sugar works best, Starbucks Via is too bitter)
  • 1 cup + 2 tbsp sugar
  • 1 tbsp vanilla
  • 3 eggs
  • 72g flour (1/2 cup)
  • 1 1/2 tsp baking powder
  • 1 tsp salt

2 tbsp flour for coating the 129g (2/3 cup) of chocolate chips


Preheat oven to 350 and spray a 9x13 baking dish with cooking spray.

Melt together butter, 283g (1 1/4 cups) chocolate chips, and the cocoa powder in a medium bowl over simmering water.

Remove from heat and allow to cool slightly.

In a large bowl, add eggs, coffee powder, vanilla and sugar. Gently stir (do not beat).

Stir chocolate mix into eggs and allow to cool to room temperature.

In a medium bowl, sift together 1/2 cup flour, baking powder and salt.

Add to cooled chocolate mixture.

Toss remaining chocolate chips (2/3 cup) with 2 tbsp flour; add to chocolate batter and lightly stir to combine.

Pour into baking dish.

Bake for 30-35 minutes. Do not over bake.

Allow to cool, cut into squares.

05 December 2015

Orange Muffins with Brown Sugar Glaze = YUM!!

How did I not know about this sooner?! Orange juice combined with brown sugar to form a glaze to pour over muffins is AMAZING.

I imagine it would be great on all sorts of goodies. A plain cupcake, waffles, pancakes, a spoon.

I found a recipe in a cookbook that's been on my bookcase for years and decided to give it a try, since I had all of the ingredients in the kitchen already.

The orange and brown sugar glaze was the finish. So, so good. I'll make that again. Not sure about the muffins. They were a bit time-consuming.

Zest of two oranges plus juicing them takes quite a bit of time. It made two dozen and they lasted all week, so maybe. If I can get one of the boys to do the zesting and juicing, it would go so much faster.

The boys loved these. Max asks for mum-ins at least once a day. That little boys loves his baked goods!

Here is the recipe. It's adapted from the pioneer woman.

Orange muffins with brown sugar glaze

  • 1 cup (226 grams) Salted Butter, Softened
  • 1 cup White Sugar
  • 2 cups (300 grams, I think. Need to double check that) Flour
  • 2 whole Eggs
  • 1 cup Buttermilk (OR 1 tbsp white vinegar added to just under 1 cup of milk)
  • 1 teaspoon Baking Soda
  • 2 whole Oranges, Juiced And Zested 
  • 1 cup Brown Sugar (lightly Packed) 
Cream together butter and white sugar in a mixing bowl. 
Add eggs, beat well, then add baking soda, buttermilk (or buttermilk substitute) and the orange zest. Mix. Stir in flour just to combine. Don't over mix or muffins will be tough.

Line muffin pans with paper or silicone muffin cups. Fill each cup 2/3 full. (This recipe yields 2 dozen regular sized muffins)
Bake at 375ºF for 20 to 25 minutes, or until lightly browned.
In a separate bowl, combine brown sugar and juice from the freshly zested oranges. You should have about ½ cup. Mix well. Drizzle this glaze over the warm muffins. 
Remove muffins from the pan while still warm.
Perfect with a morning cup of coffee

25 September 2011

Cupcakes!

I made some cupcakes the other day, and they turned out cuter than I expected they would.  They were pretty time-consuming to make, but I think you'll agree, worth the trouble!

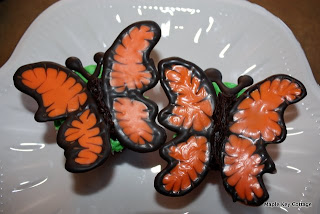
chocolate butterfly cupcakes
Chocolate Butterflies on top of green frosted chocolate cupcakes

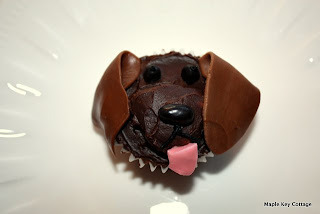
puppy cupcakes
Cute little puppy!

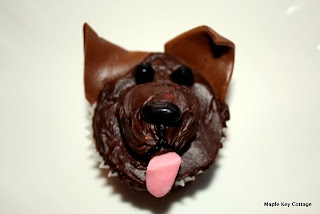
dog cupcake

I used jelly beans for the eyes and noses. Smaller ones for the eyes, since the large ones were TOO big and looked kind of scary!

The tongues were tricky, since I didn't have the right candy. I ended up cutting apart some of those gummy teeth (found at the Bulk Food store). I used a knife to cut off the white "tooth" portion, then rolled out the pink "gums". It took a bit of manipulation to get the shape right, but like how they turned out.

The ears were another component that took some time to do. I used mini tootsie rolls,  unwrapped and microwaved them (2 at a time, so they wouldn't cool before I had time to shape them) for about 10 seconds to soften. I then rolled them out so they would be flat, then used a paring knife to cut away and help shape them into ears.

Muzzles are just 1/2 of a large marshmallow with frosting on top.

For the butterflies, I first found a photo of a butterfly online that had a good silhouette, printed it off and traced the outline onto a few small pieces of paper. I then put a piece of paper under some wax paper, and used melted chocolate to trace the outline.

After I traced 4 or so, I switched colours and flooded the inside of the wings with melted orange chocolate. I only did a few at a time, because I wanted to be able to work with the dark chocolate before it set. After flooding, I used a toothpick to make lines from the dark into the orange.

Once all that was done, the whole lot got put into the freezer to set while I worked on creating the antenna out of more chocolate. They got put in the freezer for a few minutes as well.

Once all the chocolate was set, it was time to assemble. So exciting, I just couldn't wait to see if they would turn out or not, and if the wings would melt. I put both wings pretty close together on top of a cupcake, then filled in the small gap I left with more chocolate.  Added the antenna, and they were done!

To keep the wings from toppling over, I pipped a bit of extra frosting underneath to help stabilize.